MySQL: -
MySQL is an open-source database management system, commonly installed as part of the popular LAMP(Linux, Apache, MySQL, PHP/Python/Perl) stack. It uses a relational database and SQL (Structured Query Language) to manage its data.
Prerequisites: -
To follow this tutorial, you will need:
One Ubuntu 16.04 server set up by following this initial server setup guide, including a sudo non-root user and a firewall.

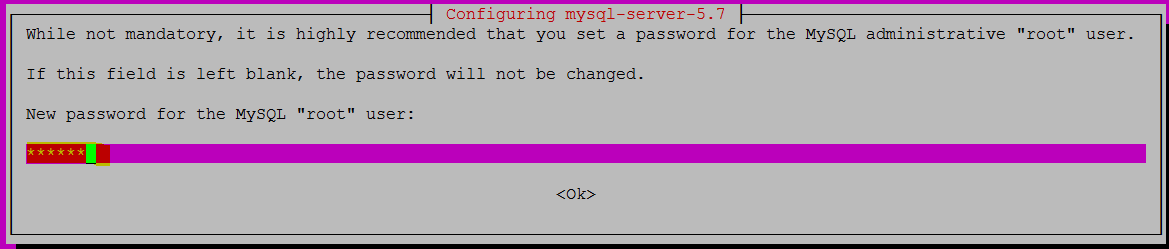
- during installation, it will prompt you to set the MySql root password
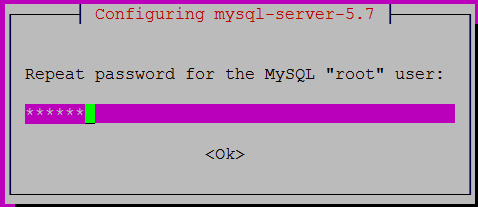
- Retype Password once prompt
MySQL is an open-source database management system, commonly installed as part of the popular LAMP(Linux, Apache, MySQL, PHP/Python/Perl) stack. It uses a relational database and SQL (Structured Query Language) to manage its data.
Prerequisites: -
One Ubuntu 16.04 server set up by following this initial server setup guide, including a sudo non-root user and a firewall.

Step 1: - Installing MySQL
To Install MySQL simply use apt-get command as follow:
root@ip-10-0-1-168:~# apt install mysql-server
Once you hit enter button it will prompt y/n type Y and hit enter.
root@ip-10-0-1-168:~# apt install mysql-server
Reading package lists... Done
Building dependency tree
Reading state information... Done
The following packages were automatically installed and are no longer required:
  linux-aws-headers-4.4.0-1013 linux-headers-4.4.0-1013-aws linux-image-4.4.0-1013-aws
Use 'sudo apt autoremove' to remove them.
The following additional packages will be installed:
  libaio1 libcgi-fast-perl libcgi-pm-perl libencode-locale-perl libevent-core-2.0-5 libfcgi-perl libhtml-parser-perl libhtml-tagset-perl libhtml-template-perl libhttp-date-perl
  libhttp-message-perl libio-html-perl liblwp-mediatypes-perl libtimedate-perl liburi-perl mysql-client-5.7 mysql-client-core-5.7 mysql-common mysql-server-5.7 mysql-server-core-5.7
Suggested packages:
  libdata-dump-perl libipc-sharedcache-perl libwww-perl mailx tinyca
The following NEW packages will be installed:
  libaio1 libcgi-fast-perl libcgi-pm-perl libencode-locale-perl libevent-core-2.0-5 libfcgi-perl libhtml-parser-perl libhtml-tagset-perl libhtml-template-perl libhttp-date-perl
  libhttp-message-perl libio-html-perl liblwp-mediatypes-perl libtimedate-perl liburi-perl mysql-client-5.7 mysql-client-core-5.7 mysql-common mysql-server mysql-server-5.7
  mysql-server-core-5.7
0 upgraded, 21 newly installed, 0 to remove and 38 not upgraded.
Need to get 18.9 MB of archives.
After this operation, 162 MB of additional disk space will be used.
Do you want to continue? [Y/n] Y
You'll be prompted to create a root password during the installation. Choose a secure one and make sure you remember it because you'll need it later. Next, we'll finish configuring MySQL.
Step 2: - Configure MySQL
For fresh MySQL installation, We need to change the security of MySQL by using MySQL secure installation wizard:
root@ip-10-0-1-168:~# mysql_secure_installation
During the MySQL secure installation wizard change as following
MySQL Installation has done.
Step 3: - Test MySQL
Check MySQL service status
Enter password for user root: ******

VALIDATE PASSWORD PLUGIN can be used to test passwords
and improve security. It checks the strength of password
and allows the users to set only those passwords which are
secure enough. Would you like to setup VALIDATE PASSWORD plugin?

Press y|Y for Yes, any other key for No:
Using existing password for root.
Change the password for root ? ((Press y|Y for Yes, any other key for No) : no

 ... skipping.
By default, a MySQL installation has an anonymous user,
allowing anyone to log into MySQL without having to have
a user account created for them. This is intended only for
testing, and to make the installation go a bit smoother.
You should remove them before moving into a production
environment.

Remove anonymous users? (Press y|Y for Yes, any other key for No) : yes
Success.


Normally, root should only be allowed to connect from
'localhost'. This ensures that someone cannot guess at
the root password from the network.

Disallow root login remotely? (Press y|Y for Yes, any other key for No) :

 ... skipping.
By default, MySQL comes with a database named 'test' that
anyone can access. This is also intended only for testing,
and should be removed before moving into a production
environment.


Remove test database and access to it? (Press y|Y for Yes, any other key for No) : no

 ... skipping.
Reloading the privilege tables will ensure that all changes
made so far will take effect immediately.

Reload privilege tables now? (Press y|Y for Yes, any other key for No) : yes
Success.

All done!
MySQL Installation has done.
Step 3: - Test MySQL
Check MySQL service status
root@ip-10-0-1-168:~# systemctl status mysql.service
● mysql.service - MySQL Community Server
   Loaded: loaded (/lib/systemd/system/mysql.service; enabled; vendor preset: enabled)
   Active: active (running) since Sat 2017-06-10 09:04:49 UTC; 27min ago
  Process: 4981 ExecStartPost=/usr/share/mysql/mysql-systemd-start post (code=exited, status=0/SUCCESS)
  Process: 4969 ExecStartPre=/usr/share/mysql/mysql-systemd-start pre (code=exited, status=0/SUCCESS)
 Main PID: 4980 (mysqld)
    Tasks: 29
   Memory: 163.2M
      CPU: 712ms
   CGroup: /system.slice/mysql.service
           └─4980 /usr/sbin/mysqld
MySQL Version and UPTime
root@ip-10-0-1-168:~# mysqladmin -u root -p version
Enter password:
mysqladmin  Ver 8.42 Distrib 5.7.18, for Linux on x86_64
Copyright (c) 2000, 2017, Oracle and/or its affiliates. All rights reserved.

Oracle is a registered trademark of Oracle Corporation and/or its
affiliates. Other names may be trademarks of their respective
owners.

Server version          5.7.18-0ubuntu0.16.04.1
Protocol version        10
Connection              Localhost via UNIX socket
UNIX socket             /var/run/mysqld/mysqld.sock
Uptime:                 30 min 19 sec

Threads: 1  Questions: 7  Slow queries: 0  Opens: 115  Flush tables: 1  Open tables: 34  Queries per second avg: 0.003
No comments:
Post a Comment