Introduction :-
This is the blog, How to mount Windows Share to Linux machine permanently using CIFS.For an Administrator, it is required many times to mount Windows share into Linux Server, It could be due to some backup or copy data from Linux machine to Windows machine.
Requirement :-
We need two working PC :1- Windows PC where share needs to create.
2- Linux PC where share needs to Mount.
Configuration Steps :-
1- Windows Machine side configuration :-1 A- Create a shared folder and assign permission to a user using below steps :
- Create a folder name website in any drive
- go to properties
- Select Share TAB
- Click on Advanced Sharing button
- Select the Check box Share this folder
- Select permission button
- Click On ADD
- Enter User Name whom you want to give permission -
- Select Full Control check box
- click on Apply and OK
Note- The Same User Name and it's password, We will use to Mound this folder into Linux machine.
2- Linux Machine side configuration :-
We need to install the following package
1- CIFS-UTILS
[root@testsvn ~]# apt install cifs-utils
[root@testsvn ~]# vi .smbcredentials
domain=example.local
username=User_Name This user would be same whom we give permission on shared folder.
password=User_Password
sec=ntlm
Save and Exit from file.
Note- if you are sharing folder on a PC not a member of Domain controller then use this format
username=User_Name
password=User_Password
2 C- Now change credentials file permission -
2 D- Create mount directory and FSTAB entry to add this mount permanently -
password=User_Password
sec=ntlm
Save and Exit from file.
Note- if you are sharing folder on a PC not a member of Domain controller then use this format
username=User_Name
password=User_Password
2 C- Now change credentials file permission -
[root@testsvn ~]# chown root .smbcredentials                  To make root owner of this file
[root@testsvn ~]# chmod 600 .smbcredentials                   To Give root user RW permisson
2 D- Create mount directory and FSTAB entry to add this mount permanently -
Create a mount directory -
[root@testsvn ~]# mkdir /mnt/winshare
Let's test access on share folder using mount command.
[root@testsvn ~]# mount -t cifs -o credentials=/root/.smbcredentials //10.0.1.13/websites /mnt/winshare
In above example detail as follow:
mount = command
-t cifs = where t is type and Cifs is filesystem
-o = where -o is option
credentials = command to define credentials path
/root/.smbcredentials = This path contain User_Name and Password
//10.0.1.13/websites = Windows Share path
/mnt/winshare = Linux PC mounting directory
Let's check mounting using mount command -
[root@testsvn ~]# mount
/dev/mapper/VolGroup-lv_root on / type ext4 (rw)
proc on /proc type proc (rw)
sysfs on /sys type sysfs (rw)
devpts on /dev/pts type devpts (rw,gid=5,mode=620)
tmpfs on /dev/shm type tmpfs (rw)
/dev/sda1 on /boot type ext4 (rw)
none on /proc/sys/fs/binfmt_misc type binfmt_misc (rw)
//10.0.1.13/websites on /mnt/winshare type cifs (rw)
[root@testsvn ~]#
Windows Share folder have been mounted successfully !!!!
Let's Make FSTAB entry to mount permanently
[root@testsvn ~]# vi /etc/fstab
Append below line into this file.
//10.0.1.13/websites /mnt/winshare cifs credentials=/root/.smbcredentials,uid=1000,gid=1000
Save and Exit from file.
Now you fstab file looks like below :
etc/fstab
# Created by anaconda on Tue Feb  2 12:30:07 2016
#
# Accessible filesystems, by reference, are maintained under '/dev/disk'
# See man pages fstab(5), findfs(8), mount(8) and/or blkid(8) for more info
#
/dev/mapper/VolGroup-lv_root /                       ext4    defaults        1 1
UUID=3291b0ee-d2d5-44eb-9418-d2b81c72ea8e /boot                   ext4    defaults        1 2
/dev/mapper/VolGroup-lv_swap swap                    swap    defaults        0 0
tmpfs                   /dev/shm                tmpfs   defaults        0 0
devpts                  /dev/pts                devpts  gid=5,mode=620  0 0
sysfs                   /sys                    sysfs   defaults        0 0
proc                    /proc                   proc    defaults        0 0
//10.0.1.13/websites    /mnt/winshare   cifs  credentials=/root/.smbcredentials,uid=1000,gid=1000
Run command mount -a to refresh entry.
[root@testsvn ~]# mount -a
3 - Let's check mounted folder-Go to mount directory
[root@testsvn ~]# cd /mnt/winshare/
Create test dir using mkdir command
[root@testsvn winshare]# mkdir test
Now go to Windows PC and check test folder would be there.
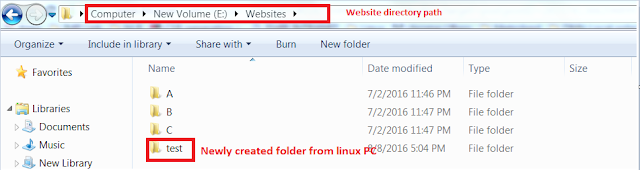
We have successfully mounted Windows share folder to Linux machine.
That's All
!!!Cheers!!!
Thank you for sharing this helpful blog post on how to mount a Windows share to Ubuntu. It's always valuable to learn about different techniques for integrating different operating systems. Speaking of seamless integration, if you're looking for a reliable hosting solution to support your Linux-based projects, I highly recommend considering Sweden VPS Hosting.
ReplyDelete